Weighted blankets are great for many SPD/Autistic/Asperger kids(and adults). Thing 1 is a stimulation seeker and loves to touch and hug people, especially when he's upset or overstimulated(how's THAT for a paradox?). He has to be tucked in nice and tight at bedtime or he will flop around for hours trying to go to sleep. I am not a hugger. I do not like people in my space, touching me, especially when I'm frustrated or upset. You can see how this might be a problem.
As I've researched therapies and things that are available for him and watched the OT at work I've started to really want a weighted blanket for him. It would help calm him at bed time, and it would give him something to wrap up in when he is upset or needs a break, a "portable hug" if you will. One catch, weighted blankets are expensive. The manufactured ones run upwards of a hundred dollars, and the handmade ones can start at about $65, plus shipping, though I've seen the handmade ones for $140 or more. I just shelled out 50 bucks for a weight belt, I'm not in a position to fork over a bunch more for a blanket. So, like a true Alaskan, I decided to save a little coin and try to jury rig one from stuff (mostly)in my house. Here's how:
First you need to know how much weight you need. General rule of thumb is to NOT exceed 15% of the person's body weight, shoot for 10% plus one pound. Thing 1 weighs about 50 pounds and I decided to make the blanket with 6 pounds of weight. Ask your OT for their input if you can or be prepared for trial and error.
Decide what you'd like to fill with. You can use fine grade river stone, Poly pellets, or even non lead metal pellets. I decided on the Poly pellets because they offer more bulk than the other two options, feel softer when squished and cuddled, and are easy to find, being offered at many craft/fabric stores as filling for stuffed animals and dolls. Poly pellet blankets are machine washable, which is a total plus for me. I found the pellets in 2 pound bags at Michaels. A two pound bag has almost exactly 6 1/2 cups of pellets, you'll need that info for later.
The body of the blanket: I found two flat sheets that were missing their fitted partners or that I was willing to sacrifice. This was helpful because I could do one side in flannel, for next to his skin in winter(warmish and easy to layer), and one side in cotton, for next to his skin in the warm summer months. Thing 1 hates to be hot, but I think with the breathability of the lighter weight sheets and our air conditioning he should do fine. You could use a heavier weight flannel fabric or even fleece, but I like the versatility of the two sides for my kid, who is finicky about temperature. I also decided to use a plaid sheet because the lines from the pattern gave me simple guides to follow, reducing my marking and measuring significantly. You can get sheets super cheap at thrift stores, yard sales, or even ask friends and family for their orphaned sheets.
Next, I found a good sized blanket that he likes and measured it. In addition to the outer dimensions, I made note of how much of the blanket actually covered his body and how much was jut laying off on the edges. No sense in putting weight where it's not going to actually touch him. I ended up with a blanket that was about 55 inches wide, and I decided that one foot on either side would not be weighted, as well as a few inches at the bottom, since he likes to poke his feet out. I measured about 60 inches for the length.
I pinned the two sheets, right sides together, on the long edge and ironed them out so they'd lay flat together. Then I stitched along the edges, one at a time, sort of lining them up as I went, and leaving the top edge open and unstitched. I trimmed some of the excess fabric, and then flipped it right side out. I hemmed it around the sewn edges to make sure everything stayed in place.
Next you'll need to sew your channels. Just measure, mark, and sew straight from the bottom to the top, like this:
The shaded areas are the spots where there will be no weighting.
The next part is tricky. Sort of. Figure out how many squares you're going to have across the body of the blanket. I followed the pattern of the plaid and ended up with 60 squares that were about 5 inches on each side. I had 3 bags, or about 19 cups, of pellets. I divided 19 by 60 to get .316, which I rounded to .33, an even third. So roughly a third of a cup of pellets would go into each of my squares. Or you can just guess, whatever.
I dumped a third of a cup down each of my weighted rows, rolled the top of the blanket down tightly(to easily fit it in the opening of the sewing machine and to keep the pellets in) and stitched across the blanket along the tops of the row of squares. Lather Rinse Repeat, like so:
Those little pellets are tricky buggers. This was the most time consuming part of the whole thing, as the pellets will roll and move and generally drive you crazy. I swear I heard the little bastards snickering at me about halfway through. Just take your time and try to be patient.
Once I finished my squares I folded the top over twice and hemmed it because I was too tired to do anything nicer. He's 6, he won't care.
The finished product: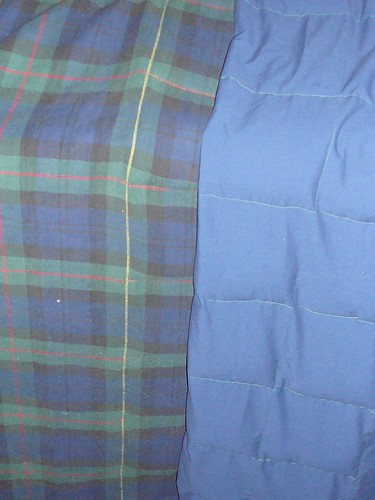
The colors are actually much deeper than in the picture. The navy blue cotton with the plaid flannel looks good and I used dark green thread that you can hardly see on the flannel side, so it looks like a regular old lightweight blanket until you get close. The weight is well distributed and this blanket is big enough to last for quite a while, as I tried it out on myself to make sure of the sizing. As he gets bigger he may want a heavier blanket, but maybe the 6 pounds will be enough to comfort him as he grows, only time will tell. You can add fringe or rope knots to the edges. You could add straps with buttons or velcro to attach fidget toys or chewies. You really could do about anything to personalize this to your kid's needs.
This took about 6 hours with breaks for dinner and our bedtime routine in there somewhere, but would probably take a lot less time for a more experienced seamstress. Total cost was roughly $25 for the pellets, everything else I already had on hand. This is a relatively simple project, if I can do it, just about anyone can.
It's hard enough having a quirky kid, adding the financial burden of special equipment to the mix just makes it harder. I hope this helps bring comfort to your child and your pocketbook. Please pass it along if you know of someone who could use this info.
If you found this post useful, check out the one about making a cuddle swing
Throwing these in for search results: How to, home made, homemade, do it yourself, diy, sensory therapy
Make your own weighted blanket
Saturday, March 28, 2009Posted by Mo at 12:19 AM 10 bits of wisdom
Subscribe to:
Posts (Atom)